> ## Documentation Index
> Fetch the complete documentation index at: https://docs.ahaslides.com/llms.txt
> Use this file to discover all available pages before exploring further.
# AhaSlides 이메일 주소 변경하기
> 내 프로필에서 몇 가지 간단한 단계만 거치면 AhaSlides 계정에 연결된 이메일 주소를 변경할 수 있습니다.
AhaSlides 계정에 연결된 이메일 주소를 변경하는 방법을 알아보세요.
## 이메일 주소 변경하기
AhaSlides 계정에 로그인한 다음 **내 프로필** (My Profile)로 이동합니다.
**이메일 변경** (Change email)까지 아래로 스크롤한 다음 **수정** (Edit)을 클릭합니다.
새 이메일 주소를 입력하고 현재 비밀번호를 확인합니다.
**이메일 업데이트** (Update email)를 클릭합니다.
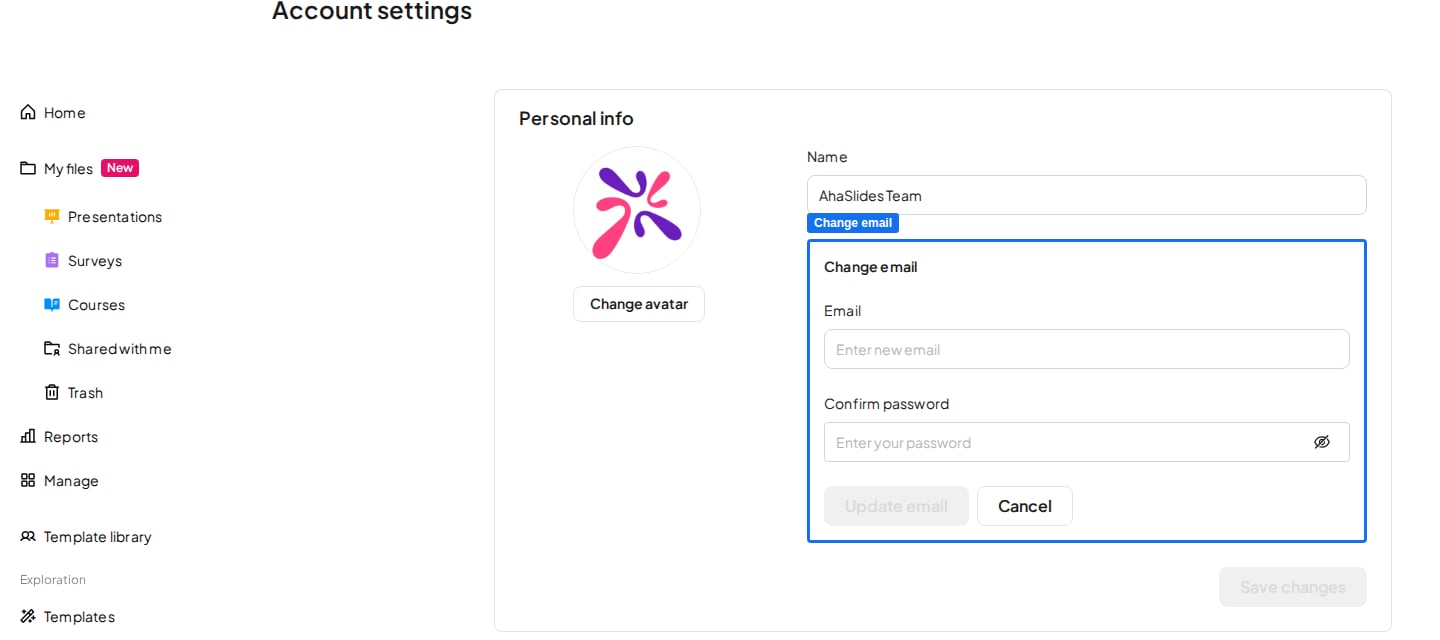 계정 이메일은 즉시 업데이트되며, 다음에 로그인할 때부터 새 주소를 사용하시면 됩니다.
새 주소는 자동으로 인증되지 않으며, 이메일을 변경해도 인증 링크가 발송되지 않습니다. **내 프로필** (My Profile)에서 새 이메일 옆의 방패 아이콘에 경고가 표시되면 아이콘 위에 마우스를 올리고 **지금 인증하기** (Verify now)를 클릭하세요. 자세한 단계는 [이메일 주소 인증하기](/ko/getting-started/creating-your-ahaslides-account#이메일-주소-인증하기)를 참고하세요.
**궁금한 점이 있으신가요?**
지원팀에 문의해 주세요. 로그인한 상태라면 대시보드 오른쪽 아래의 채팅 아이콘을 사용하시고, 그렇지 않다면 [여기에서 문의하시거나](https://ahaslides.com/contact-us/) [hi@ahaslides.com](mailto:hi@ahaslides.com)으로 이메일을 보내 주세요.
다른 사용자와 소통하고 싶으신가요? [AhaSlides 커뮤니티](https://community.ahaslides.com/)에 참여해 팁을 공유하고, 기능을 제안하고, 다른 사람들이 청중의 참여를 이끄는 방법을 살펴보세요.
This documentation is built and hosted on [Mintlify](https://mintlify.com), a developer documentation platform.
계정 이메일은 즉시 업데이트되며, 다음에 로그인할 때부터 새 주소를 사용하시면 됩니다.
새 주소는 자동으로 인증되지 않으며, 이메일을 변경해도 인증 링크가 발송되지 않습니다. **내 프로필** (My Profile)에서 새 이메일 옆의 방패 아이콘에 경고가 표시되면 아이콘 위에 마우스를 올리고 **지금 인증하기** (Verify now)를 클릭하세요. 자세한 단계는 [이메일 주소 인증하기](/ko/getting-started/creating-your-ahaslides-account#이메일-주소-인증하기)를 참고하세요.
**궁금한 점이 있으신가요?**
지원팀에 문의해 주세요. 로그인한 상태라면 대시보드 오른쪽 아래의 채팅 아이콘을 사용하시고, 그렇지 않다면 [여기에서 문의하시거나](https://ahaslides.com/contact-us/) [hi@ahaslides.com](mailto:hi@ahaslides.com)으로 이메일을 보내 주세요.
다른 사용자와 소통하고 싶으신가요? [AhaSlides 커뮤니티](https://community.ahaslides.com/)에 참여해 팁을 공유하고, 기능을 제안하고, 다른 사람들이 청중의 참여를 이끄는 방법을 살펴보세요.
This documentation is built and hosted on [Mintlify](https://mintlify.com), a developer documentation platform.